Exposure compensation
 |
| f13, 1/200 |
The light meter in your camera will measure the light which bounces via your subject back to the camera and translate it to a middle grey. Is your subject very different from those medium tones, like a snowscape or a night shot then you have a problem: your camera will try to make those pictures grey too and you don't want that.
 |
| f13, 1/160 |
One way of dealing with that is by using a grey card: you hold a grey card in front of your subject, measure the light, lock it with the AE lock (on a Canon DSLR it is the button with *), quickly remove the grey card and push the shutter button completely.
 |
| f13, 1/125 |
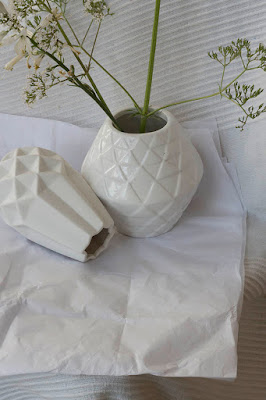
I prefer a different method: exposure compensation. This means that I over expose high key images (an image that mainly consists of light tones like snow) and under expose low key images (an image that mainly consists of dark tones).
 |
| f13, 1/100 |
When you don't know your camera very well yet, you can practice by over or under exposing your image by one stop at the time like I did in this series and see what difference each stop makes. You can see that in the first picture the camera tries to make everything rather grey and by changing the shutter speed stop by stop the vases appear more white. For all these photographs I used a fixed 50 mm lens and put the camera in Av mode.
 |
| f13, 1/80 |
After you've done this a few times, you can be more accurate when photographing a beautiful black car. You can also use this method next time you go on a sky holiday and then the snow will actually look white and not grey.
 |
| f13, 1/60 |


No comments:
Post a Comment